How to Change DNS For a Domain #
DNS (Domain Name System) translates domain names (like www.yourdomain.com) into IP addresses that computers use. Changing your DNS settings directs where visitors are sent, such as to your website or email services, ensuring everything works correctly.
To change the DNS nameservers for your domain, you are welcome to use this video guide from our partner, Namecheap:
Alternatively, you can refer to the step-by-step illustrated instruction below.
Changing the DNS for your domain is a straightforward process that involves the following steps:
1. If you bought your domain name via our partner Namecheap, Log in to your Namecheap account (otherwise login wherever you purchased your domain name).
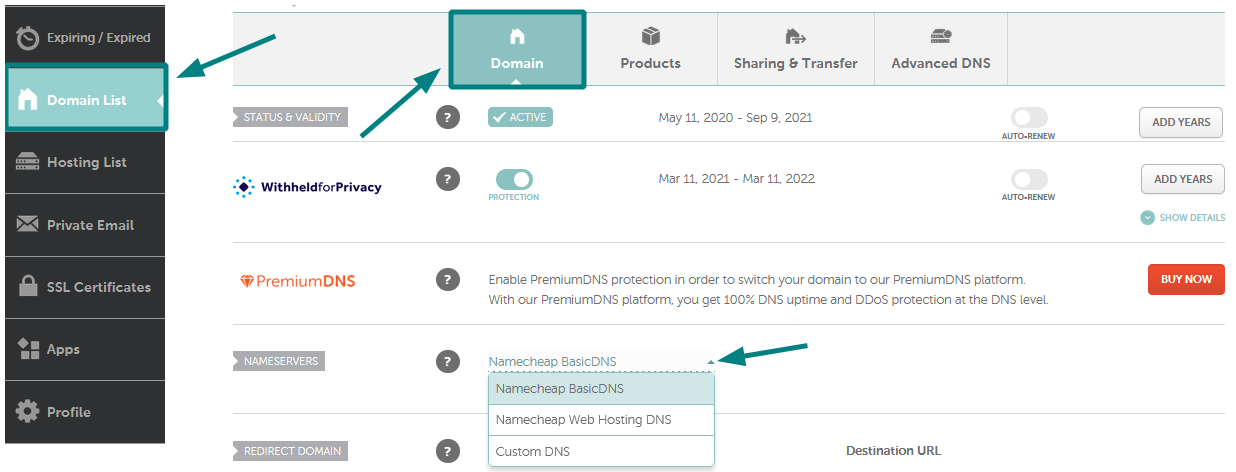
2. For Namecheap domains, from the left sidebar, select Domain List and click on the Manage button next to your domain (your registrar may have different settings, but you’re looking for DNS, NS, or Nameserver settings):

3. In the Nameservers section, select your preferred option from the drop-down menu and click on the green checkmark to save the changes:

NOTE: Nameservers are part of the Domain Name System (DNS) database that acts as a directory for devices and the IP addresses attached to them. When registering nameservers, an IP address is assigned to them, and unregistered nameservers cannot work correctly with some domains.
Nameserver Settings #
Set your nameservers as follows:
- Primary nameserver: hostcp.icllc.cc
- Secondary nameserver: ns2.icllc.cc
For Namecheap domains, choose CustomDNS: If you want to point your domain to custom nameservers (for example, IChost hosting nameservers), fill in the nameservers provided in your welcome email and click on the green check-mark to save the changes:
NOTE: Enter the nameservers in your welcome email. If you were provided with both the nameservers and IP addresses, only the nameservers should be inserted as custom nameservers.
Considerations #
NOTE: If you change nameservers from another provider, the host records will not be added to the new nameservers automatically. Please make sure to save all the needed settings and set them up manually after the nameservers switch.
Nameserver changes do not propagate instantly. It may take up to 24 hours (more, in rare cases) for local ISPs to update their DNS caches so that everyone can see your website. Email may also be interrupted during this time, but missed emails that were undeliverable during this time are usually re-sent within 24-48 hours. You can always check your domain name using a proxy server as they do not store cache and will show non-cached information.
That’s it!


